


Once you start cleaning it up and restoring it, one of the worst looking areas on a motorcycle is the wiring harness. The wires fade, connectors crack and break apart, electrical tape is dangling everywhere, and it is routed around the motorcycle in no particular order. What can be done about this cosmetic issue?
The top 5 ways to hide motorcycle wiring is to:
- Route black wire loom along the frame
- Fit a lot of wires into the headlight bucket
- Attach it between frame rails underneath the seat
- Add extra wire in spots so it can route around open areas
- Create a concealed electrical box as part of the seat
I have personally tried all 5 of these methods on all of my motorcycle builds. In the sections below I’ll walk you through how to do each one and tell you about my personal favorite methods. But the best method is to use a combination of the ones above that work best for your personal situation.
Use Black Wire Loom That Routes Only Along The Frame
Every motorcycle that I restore, I paint the frame black because it can hide a lot of imperfections and it can hide the black electrical wiring loom that runs along the inside of the frame (click here to see my article on how to paint a motorcycle frame). And when I say inside the frame, I just mean placing it on the side of the frame that faces the middle of the motorcycle.
All of your wiring should be wrapped in black wiring loom that you can get for really cheap online or at any auto parts store. Buy the smallest diameter loom that will barely fit all your wires inside it, you don’t want bulky loom that slides around. It ends up looking really bad after a little while.
After you wrap all of your wiring harness in black loom, secure it nice and tight to the frame using black zip ties. Put them in the most inconspicuous spots and don’t put a zip tie in the middle of a stretch of frame, it will look bad. Zip tie on edges and corners that are out of the way where people don’t tend to look as much.
Running your wires along the frame makes it look like there is no wiring harness from the side view. This project can be completed in a few hours if your fuel tank and seat are already taken off. Always remember to wrap any ugly connectors (connections are where two sets of wires clip together) with black electrical tape.
Stuff As Much In The Headlight Bucket As You Can
The headlight bucket is a perfect place to put in as much of the forward wiring harness as possible. There is a lot of electrical connectors and wires at the front of the motorcycle because of all the hand controls and lights. A lot of these wires can be stuffed in the headlight bucket to clean up the front forks and triple clamp area.
If there are wires inside the headlight bucket that have the original loose black plastic sheath around them, then I usually cut that off and just rewrap the wire sets in electrical tape in order to save on space. Those black sheaths take up a lot of room and aren’t accomplishing much good since the wires are very protected inside the headlight bucket.
If there are other small electrical accessories near the handlebars like the turn signal flasher, that can many times be moved inside the headlight bucket as well. But a word of caution, don’t overfill the headlight compartment because as wires get smashed together, there becomes an increased chance that a ground and power wire could touch each other. So make sure everything is wrapped really well.
On one of my first motorcycles, I was trying to fill up the headlight bucket with a bunch of wires. I put the headlight back in and tightened the two screws on the sides and then turned the key on.
As soon as I turned it on I immediately saw smoke coming from the headlight bucket and it smelled horrible. I turned the key back off and took out the headlight to inspect the damage. I had to replace a whole bunch of wires because two small wires had rubbed up on each other. So be careful and mindful of this method.
Tucked Under The Seat
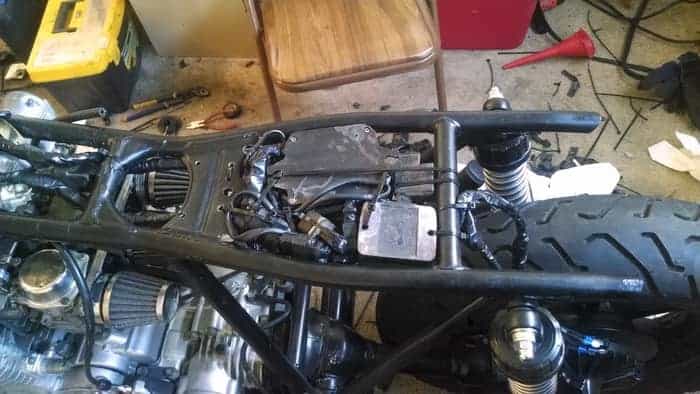
The messiest part of every motorcycle harness is usually right in the center of the motorcycle by the stock battery location. There’s usually all these connectors, small electrical boxes, fuses, relays, etc. It’s a gigantic mess and It’s hard to know where to start. Start at the front of the motorcycle and work your way back.
Once you get to the center and need help hiding all those wires, rewrap everything in black loom or black electrical tape so it looks professional. After it’s wrapped, you can pack it up really tight in between the frame rails in the center of the bike, just below where the seat is. From a side view, you won’t be able to see the wires at all using this method. From a top view with the seat taken off, you’ll be able to get to everything easily.
This method is my personal favorite that I use on all of my motorcycles. I use black zip ties to secure everything together in a flat profile and then zip tie that to both sides of the frame rails. It looks so clean from the side when you look through the frame triangle.
Once the wires are tucked up under the seat, there are usually at least 2 sections on the frame that go down from the seat to the bottom frame section. Use these two frame sections as concealers and run wires down the sides of them in order to connect to things like your rear brake light switch, your stator, your battery, etc.
Your seat can hide a huge amount of wiring, so utilize the bottom of your seat to pack as much wiring as you can. I remember the time I finally got the “clear triangle” on my first motorcycle completely cleaned out and you couldn’t see any wires; it was an awesome feeling to know that I had done all of that myself.
Add Extra Lengths Of Wire
One frustrating thing that often happens when trying to route wires along the frame is sometimes one or two of the wires aren’t quite long enough to go where you want them to. This is an easy fix and only takes a few minutes if you have the right tools. You’ll for sure need a wire cutter, click here to see the wire stripper and cutter I recommend.
Take a picture of the wires before you cut them, that way you have a record of their configuration. If both of the wires are the same color, then mark one of them so you know which ones to connect after you cut them.
After you cut them, add the needed length of new wire by twisting the copper wire ends together and then soldering the connection. Slide some shrink wrap over the soldered connection and shrink it with a hair dryer or similar heat source. After both wires have been reconnected efficiently, wrap them in wire loom or electrical tape.
Now that the wires have been lengthened, you can route them however you’d like. Getting those wires out of view adds a lot to the aesthetics of the motorcycle.
We have created an entire video series about how to restore a motorcycle from start to finish. Within this series includes how to hide wiring with in-depth instructions that will give you the clean look you desire. We also give in-depth instructions on how to rebuild carbs, perform bodywork, and tackle electrical connections. Click here if you’re interested in building your dream motorcycle!
Creating A Concealed Electrical Box As Part Of The Seat
This is one concealment method that takes a lot of work. Lots of wires need to be lengthened, the box needs to be fabricated from sheet metal, and it needs to fit appropriately in your exact model of motorcycle. I have done this method once but I didn’t like the end result as much as the other methods I have mentioned previously.
To create a concealed electrical box, you need some thin gauge sheet metal that can be formed fairly easily. It will come in handy if you have a friend with a welding machine. Find some ideas online or on social media of how you want to mount the box. It can be mounted either underneath the seat or can be concealed as the rear hump on the back of a cafe racer seat.
One thing to remember when you are creating an electrical box to hide your wires is to put some holes in the bottom of it for water drainage. At some point you’ll get water in there while washing the motorcycle or riding through rain; water can cause serious damage to both the wires as well as the box itself.
Conclusion
Hiding the wiring on your motorcycle will give it a clean, sleek look and using one of these mentioned methods will get you there. Make sure to always label wires before you cut them and ensure you won’t have any grounding issues. Good luck with your cosmetic endeavors, you’ll make your motorcycle look amazing!
Related Questions
How can I hide my motorcycle battery? Many motorcycles have room under the swingarm to mount an AGM battery on its side. If you want an even lower profile battery then consider an anti gravity lithium ion battery, but these smaller batteries won’t have the cranking life as larger batteries. You can learn more by clicking here.