
Well, it’s happened to you. You’re riding down the road and someone honks at you or you get pulled over to be informed your tail light is out. Not only is this annoying, but this is dangerous especially as a motorcycle rider.
Why is my motorcycle tail light not working? Your motorcycle tail lights may not be working most commonly because of a burnt out bulb. If the bulb isn’t the issue, the brake light switch near your handlebars may be faulty. Additionally, it could be due to bad wire connections, electrical shorts, or broken wires.
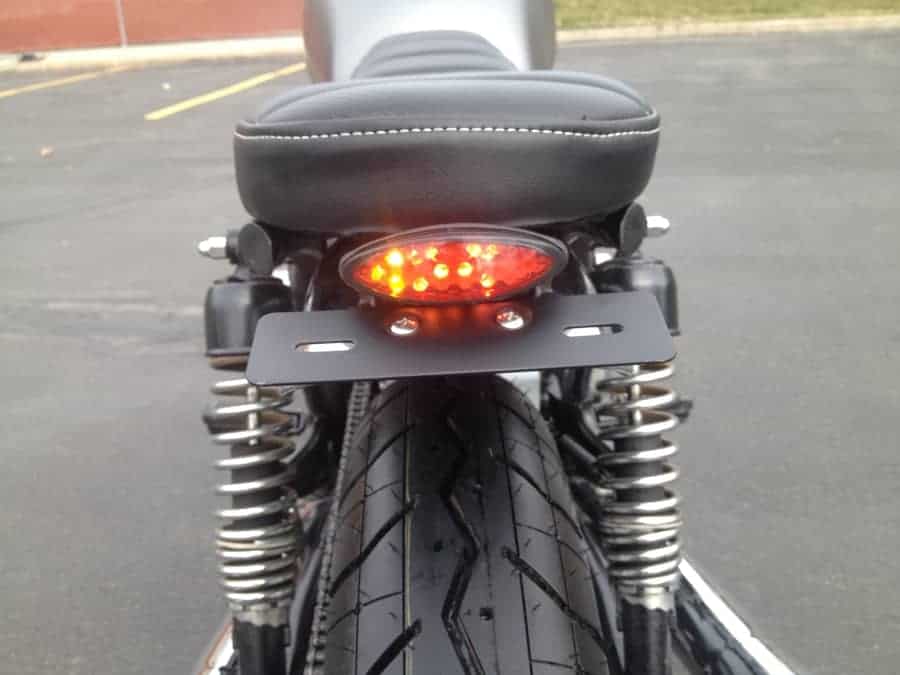
Tail lights can be a little harder to notice since they are behind you. Many times I’ve seen my taillight out and wondered how long it wasn’t working; as a rider you’re looking forward and often don’t notice what’s going on on the back of your motorcycle.
You will want to get this fixed as soon as possible. Visibility is so important when riding a motorcycle as you are already more difficult to notice due to your size. Those lights are your lifeline and are there to keep you safe. We’ll walk you through why your tail light isn’t working and what you can do to fix it.
Common Reasons Why A Motorcycle Tail Light Is Not Working
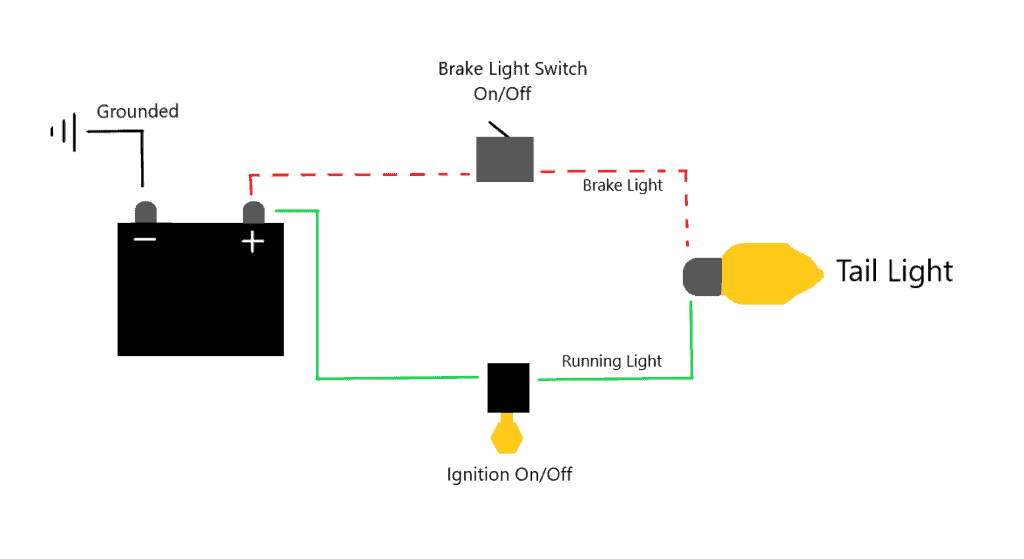
While we’re talking about tail lights, we need to clarify a few things. A tail light could entail two things: a running light and a brake light. With most motorcycles, those two lights are the same bulb. When the brakes are engaged, more power is given to that bulb so it illuminates brighter and informs other drivers around you that you’re slowing down. Again, this is most motorcycles, but not all of them.
With that being said, There are two separate wires that go to a tail light. One wire goes through the ignition switch and to the running light. Once the motorcycle is turned on, the running light automatically stays on and will stay on until the motorcycle is turned off. Another wire goes through the brake light switch to that same bulb. When the brakes are engaged, this wire is what supplies more power to the tail light to make it illuminate brighter. The following troubleshooting recommendations will apply universally.
The most common cause of your tail lights not working is a burnt out light bulb. Light bulbs do not last forever. They have an expected amount of hours in which they will be able to be lit up until they burn out. As water, dirt, and other contaminants get to the light bulb and its connector, that expected lifespan decreases. Regardless of how well you take care of your motorcycle, the lights will eventually go bad. Fortunately, replacing the lights is easy, straightforward, and cheap.
Sometimes it’s not just as simple as replacing a light bulb though. So, what else could be wrong with your motorcycle? Another potential cause of a malfunctioning tail light could be the actual brake light switch near your handlebars. If this switch goes bad, even if the lights are good, they might not light up. This is because power is never actually getting to the lights. While this doesn’t happen nearly as often as a bulb burning out, it can still happen and it’s good to be aware of it.
Lastly, you could be experiencing a series of different electrical issues along the taillight circuit. These could be bad connections, electrical shorts, broken wires, etc. These can be the most difficult issues to track down although if we are methodical about how we diagnose the issue, we can get through it quickly and easily. This will often require that you track down an electrical schematic for your taillight circuit and get some basic electrical test tools such as a digital multimeter or test light.
How To Tell If You Have An Issue With The Bulb, The Switch, Or The Wiring
So, we have talked about three different main causes of taillight failure. How can you figure out which of the three actually is the issue? There are a couple of different things that you can test to find which exactly is the issue. Let’s go through what these might be.
As we mentioned, the most common problem is a burnt-out tail light bulb. If only one of your taillights has stopped working, you can swap the light bulbs (if there are two). If you know that the one bulb is good and the other is bad, you can see if the same behavior occurs when they switch sides. If the suspect bad bulb still doesn’t work on the other side, then you just have a bad bulb.
Likewise, if the good bulb still works on the other side, then you know there aren’t any sort of wiring/electrical issues. In this case, you can just buy and install a new bulb and be done with the whole thing. Most auto stores will be able to provide you with the correct bulb replacement for your motorcycle and these bulbs are usually pretty cheap.
If the switch is suspect, you can also test this. You can use either a multimeter or test light to do this (and we will talk in a little more detail about how you could do this in a minute). You can also run a quick and simple test without those tools. All you will need is a length of wire. You will just want to run this wire as a jumper wire that bypasses the switch. That will allow power to flow around the switch as if it wasn’t even there. If doing this causes the lights to turn on, then you know that the switch is bad.
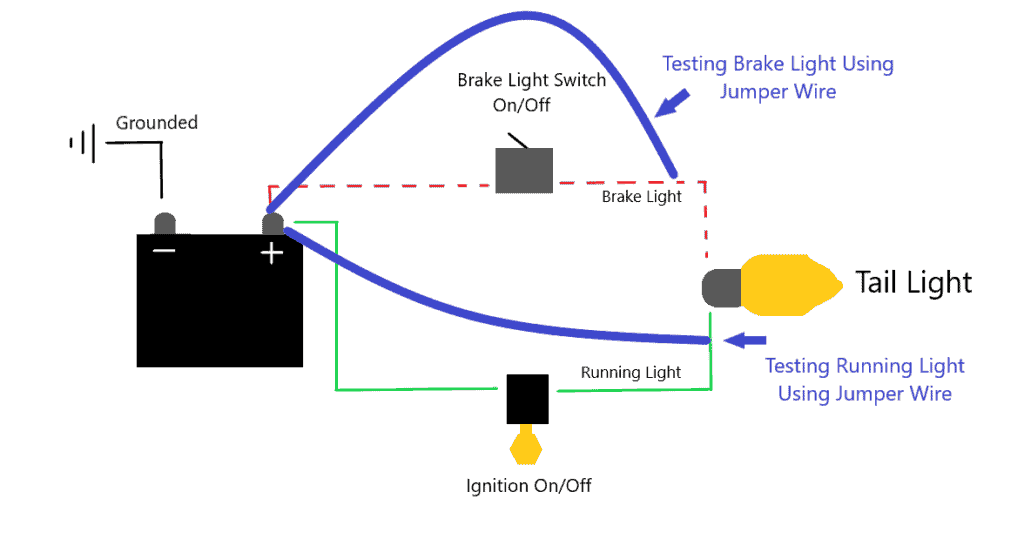
To try the jumper wire method, you’ll connect one end of the jumper wire to the positive (or the red) terminal of the battery and connect the other end to the positive terminal of the actual lightbulb. Or you can connect it to the positive wire that runs to the running light or brake light. In essence, you’re bypassing the switch and giving power directly to the bulb. If the original bulb turns on, then you’ll know there’s an issue within the switch or the wiring.
How To Use A Test Light And A Wiring Diagram To Diagnose A Non-Working Tail Light
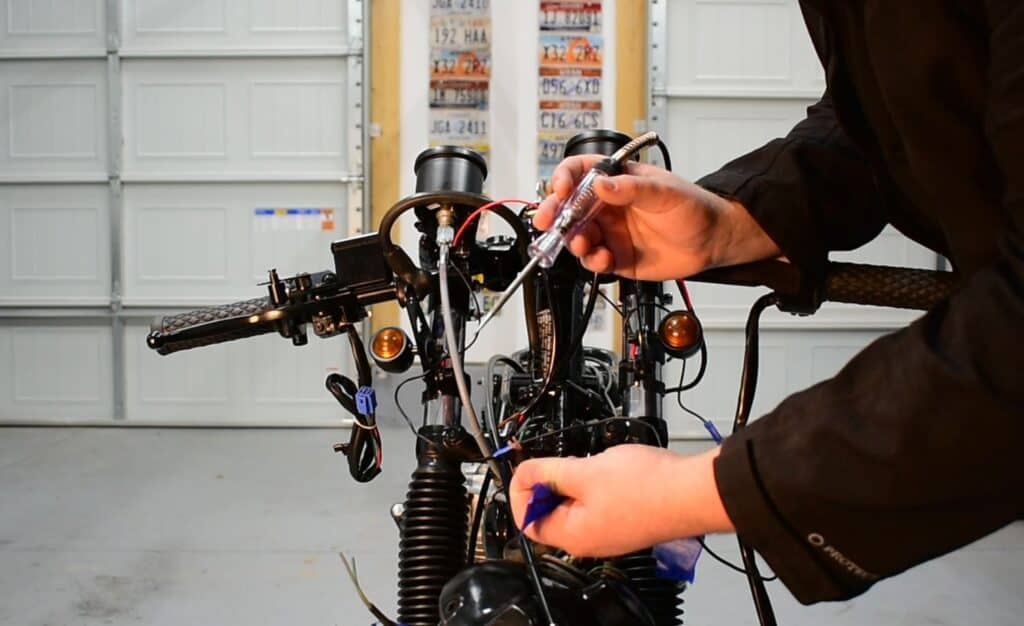
As we previously mentioned, you can diagnose your vehicles tail light circuit using just a test light. In order to do this, you will first want to track down a wiring diagram for your motorcycle. These can be found online and in some owner’s manuals as well.
You now want to locate your taillight circuit on the wiring diagram. To use the test light, ground the alligator clip somewhere on the motorcycle which can be anything metal (frame, engine bolt, negative battery terminal, etc.). You now can touch the probe to any place in an electrical circuit. If there is a 12-volt difference between the probe and the motorcycle’s ground, the light will turn on indicating that power is being supplied.
From here you can just follow along your taillight circuit and ensure you have power everywhere you should. You can start at the battery and work your way along the wiring of the brake light as well as the wiring along the running light. You can follow this all the way along to your bulbs as well. If you touch the probe where the bulb socket is in the tail light and the test light turns on but the bulb isn’t working, then you’ll know you just have a bad bulb.
How To Prolong The Life Of Tail Light Bulbs
Is there anything that you can do to make your taillights last even longer? Luckily, there are a couple of different things that you can do. First off, you can protect your lights better by covering the connection area in dielectric grease. What this grease will do is protect the bulb electrical connections from water, dirt, and other contaminants. This way your connection stays clean, and your lights keep working as they should.
Another thing that you can do is to use LED lights instead of regular incandescent bulbs. LED lights last much longer than traditional incandescent bulbs. They will cost more upfront but will last a lot longer and use much less power. So, if you want lights that last as long as possible, LEDs are the way to go.
Lastly, you can make your tail lights last longer by keeping your hands off of the actual bulbs. Touching them leaves oil residue on the bulb which can shorten the life of the bulb. So, whether you are testing the electrical circuit or putting new bulbs in, it’s best to have gloves on or use something to ensure you don’t leave oil on the bulb itself.